I’ve been thinking a fair bit about injuries, more precisely injuries thru yoga – not because of yoga, yoga doesn’t hurt, it’s our Ego that jeopardises our safety, that and incorrect/forceful adjustments. It is so easy to injure oneself these days, and especially in Ashtanga, we always hear about people having something hurting whether it be the knee, the shoulders (all those chaturanga’s) or the wrists – people are always pushing wanting to obtain a certain asana (again, the Ego). So, what do you do? What do you do to prevent & cure?
So i’ve decided to start a new column, one regarding injuries – all sorts – ranging from pulling a muscle, to fracturing the meniscus, tearing a tendon to dislocating the shoulder. And i’ve decided to start with the wrists because I’ve had quite a few students now, complain about wrist pain – either they had this already, prior to starting their yoga practice, or perhaps some experience wrist pain after practicing for some time. Here are a few exercises i’ve found online to warm up the wrists (great to do before any hand balances, handstands, but also before your practice), i’ve also included 2 videos and an infographic. Along with the exercises i’ve included advice given to me by different teachers i spoke to about wrist pain and at the end i provide healing remedies…the ones I’m aware of, used (still using) and the ones i’ve been told about from other yogis and yoginis. If you have any wisdom to share on the matter, do tell. Any additional tips/suggestion on how to look after the body and heal is greatly appreciated, not just by me, but anyone and everyone that’s ever gotten hurt.
One advice that was given to me which has helped me is one that Juha Juvanainen gave me: during the first set of Suryanamaskar A* bring your knees down and instead of upward dog, do cobra. This will allow for your wrists to slowly warm up. I have extended this to the first chaturanga of all of the Suryanamaskar B* too (but only the very first one).
* By Suryanamaskar here i mean the Ashtanga Vinyasa Sun Salutation versions A & B.
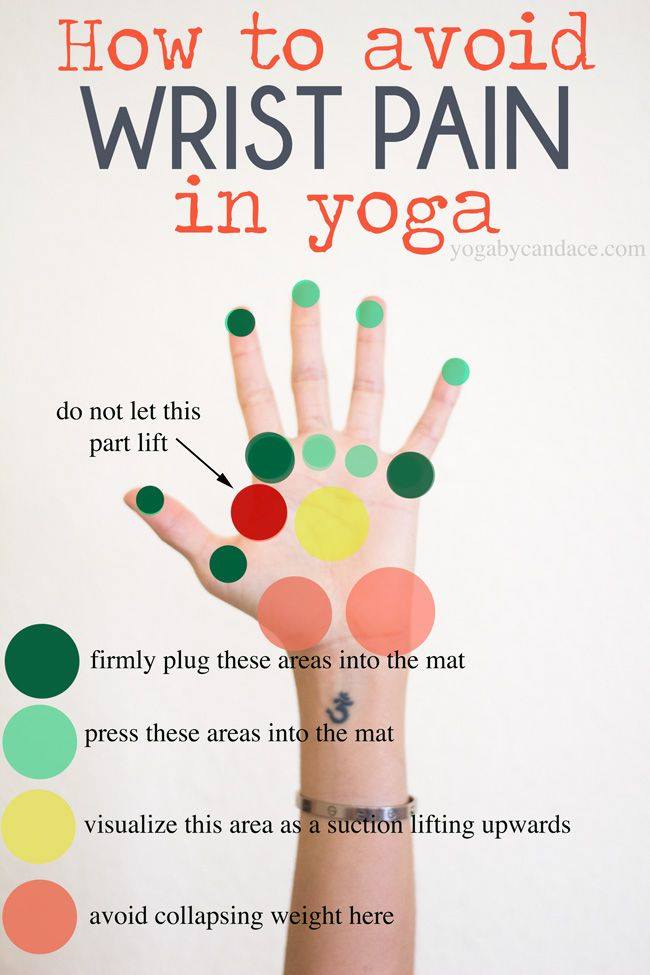
Anna Ashby has advised to have the wrist creases parallel to the short edge of the mat, by doing so you will either have your index fingers pointing forward or somewhere between the index and middle fingers pointing forward. You then want to press the index and thumb down, evenly press down all of the knuckles, activate the finger pads (finger nails pointing upward) & have an upward suction in the center of the palm (check out the pic) – what you don’t want to have is any weight on the center of the wrist, it might help to lift the wrist slightly so as not to apply any weight on this area.
** Please note: some instructions below are conflicting: some will say to keep your hands flat, some will say to allow the center of your palm to lift, so not entirely flat – i’ve asked different teachers and i’m still getting conflicting opinions. So there may not be a definitive answer, as we are all different and different things will work for different people, so go ahead and give both a go and see what works best for you 🙂

Here’s a few tips for when you find yourself in yoga class:
For poses like cat, cow, and dog it takes pressure off your wrists by using fists rather than wrists. Experimenting with yoga wedges during certain poses can also help ease wrist pain. Some poses can be avoided and replaced with other poses, for example, replacing the downward facing dog (which puts stress on the wrists) with the the dolphin pose (this pose puts no strain on the wrists). Another important thing is to always keep your palms flat on the floor if your wrists are holding weight in certain stances.
With injured wrists it can make yoga and exercise very uncomfortable, so it’s very important to do everything in your power to protect and strengthen your wrists to prevent any possible pain or injury in the future. Yoga teachers may be able to show you proper alignments that could even better protect your wrists from pain during certain poses.
~ By Ben Simpson
 Looking at Down Dog:
There could be several reasons why your wrists are not feeling so hot in Downward-Facing Dog (Adho Mukha Svanasana), but more than likely, it comes down to weight distribution and team work. When you’re newer to the practice, Downward Facing Dog looks like a pose where you are holding yourself up with your arms only. Actually, there’s more to it than that. When all the players—your legs, hips, back, arms and shoulders—actively participate there is actually minimal amount of weight on your wrists in this pose, and it can actually feel like a place where you can hang out comfortably for several breaths.
A few tricks to ease the pain:
1. Shift The Weight Off The Wrists Toward The Legs
by bending your knees generously and pressing your hips further back until your hands feel a little lighter. It’ll look like you’re crouching. Keep the weight shifting towards your legs as you lift your butt up and gradually straighten the legs, without locking the knees. Your heels don’t have to be flat against the mat, but do try to keep the front of your pelvis tilted forward and tailbone moving away from the top of the spine to elongate your back (big plus!).
2. Ground The Pose By Firming The Legs
Your heels should be directly behind the widest part of your foot so that you do not see them when you gaze between your legs. Hug your shins in toward each other as though you were trying to squeeze a block between them. This will encourage a slight inward rotation through the legs. Firm your outer thighs in a slight external rotation and lift your knee caps upward as you press your quadriceps back. Don’t lock your knees! It’ll feel as though someone is gripping you by the hips and pulling back.
3. Create Space For Your Chest And Shoulders By Firming The Outer Arms
and wrapping your triceps toward the floor (i.e. external rotation). It will feel like you’re trying to screw the cap off of jar, counterclockwise, but your hands will stay grounded on the floor. This helps broaden your collarbones and reduce tension around the shoulders. Let you ears line up with your arms.
4. Energize Your Upper Body By Activating Your Hands
even your fingertips and the bases of your fingers. Imagine your hands like suction cups as you try to distribute the weight evenly throughout. Ground the thumbs and index fingers. Your hands should be rooted but not completely flat against the floor, so the center of your palm can lift; this engages what some of my teachers call Hasta Bandha, or a hand lock.
~ By Zainab Zakari
Here’s the infographic to better visualise the instructions from Anna & the ones above:
Here’s a few more exercises:
1. Get into a tabletop position on your hands and knees. Make sure your shoulders are directly over your wrists and your hips are directly over your knees. Have your hands spread flat out and wide on the floor with your middle finger pointing straight forward, towards 12 o’clock. Now, trying your hardest to stay still in the rest of your body (and having the tops of your feet stay on the floor), begin to lift up just the heels of your hands about a quarter inch – some say just enough to squish a teeny gummy bear under there. Keep in mind that this is a really tiny movement, and the tinier the movement, the more you’ll feel it in your wrists. Keep the rest of your hands glued down to the floor. Once you’ve done this three times, holding each lift for about a second or two, you’ll do it a fourth time, this time leaning your shoulders over your wrists a few inches as the heel of the hand is lifted. Hold this for about five seconds, then slowly lower the hands down, move your hips towards your heels, and go on to tented fingertips to stretch out your wrists. Once you’re done with that, you’ll take two more rounds, one with your left middle finger pointing towards ten o’clock and your right towards two o’clock, and then vice versa (left middle finger towards two o’clock, right towards ten). Remember that as you do each round, you keep your correct and solid alignment, and really focus on breathing into your wrists. You should feel a pretty intense sensation in this area, which, over time, will decrease with strength!
2. Stay in table top, and bending your elbows out left and right, bring the tops of your hands down to the floor with your palms facing up. From here, make super super tight fists. Keeping your fists tight and the tops of your hands on the floor, begin to straighten your arms. Now, your arms might not straighten very much, but that will change with time! This is a great way to get more stretch and flexibility into the little tricky bits of the wrists. Do these everyday, at least until you feel strong enough in your wrists to try going upside down! And let me know how it goes! **These wrist stretches and strenghteners come from my great teacher, Ame Wren. Thank you Ame!
~ By Kaitlin Daddona
Ok, so we’ve done the exercises, we’ve adjusted our down dog, our hands have evenly distributed weight – what else is there to do? Here are some natural healing remedies you can add to hopefully quicken the healing process:
1. Arnical oil/cream/gel/homeopathic pills – basically anything and everything with the word Arnica is your Best Friend. This is my magical oil – I’ve been using it for years, sometimes i cover my entire body in arnica oil, sometimes i just massage the areas i want to treat;
2. Magnesium – i have this in powder form, i take 1 tsp in the morning & 1 i the evening, here in italy it’s called Magnesio Supremo, you mix it with hot water and wait a bit for it to cool off and become transparent & then drink;
3. Collagen + vit C – i’m currently taking FortiLase (muscle inflammation) & LeniArt (particularly for the knee joint and cartilage). Perhaps things like JointAce might also work, however i can’t say for sure. The active ingredients are: Collagen & Bromelina (enzyme found in the stem of pineapple);
4. wrist brace/band – i think this can offer support but it does depend on the kind of wrist injury/pain you have, it may not work for all;
5. Castor oil – another magical healing oil – i tend to warm up the oil, dip a small towel in the oil (wait for the oil to cool off first!), and then wrap the towel around the area to be treated and cover in cling film and leave for a few hrs, sometimes i even sleep with it on;
6. Tumeric tea (Curcuma) – studies have suggested turmeric has broad anti-inflammatory effects.
Here are just some remedies, I’m sure there are lots more, if you’ve discovered one that’s particularly worked for you, let me know. The best advice i can give however, is to look after yourself, practice with awareness & compassion – it’s always better to prevent than to cure (as my father always says!).
Just came across this article on wrist pain! How apt: http://www.yoganatomy.com/2014/03/wrist-pain-in-yoga/ and this one http://yogainternational.com/article/view/healing-and-preventing-wrist-injuries and this http://yogainternational.com/article/view/wrist-relief-6-poses-for-rsi-repetitive-stress-injury
http://www.yogajournal.com/article/yoga-101/learn-how-to-protect-your-wrists-in-your-practice/
https://www.youtube.com/watch?v=pUonK7Manvk&feature=em-subs_digest
Yoga for Musicians: Hands, wrists and elbows:
Yoga for Arthritis: The hands & writs:
Yoga for People wth Wrist Injuries:
Protecting Your Wrist during Yoga:
Tips for Sore Wrists after Yoga:
For all the office workers, Desk Yoga for Wrists & Fingers:
…more useful links here:
https://www.youtube.com/results?search_query=yoga+for+the+wrists
